I'm not entirely through tinkering with my Garand yet, but I'm close. Matter of fact I've done just about all I'm prepared to do myself, which means the rest will have to wait till I figure out which gunsmith I'm going to have do the remainder of the work. But let me try to detail what all I have done to it so far:
My Garand started off as a CMP Danish Service grade rifle. The receiver was made in 1943 & it was rebuilt in 1947 with a (then) new Springfield barrel. I recommend giving Kevin Baker's (of The Smallest Minority) post about his CMP Garand a read. Be careful though; Garanditus seems to be quite catchy.
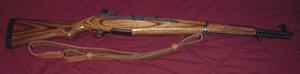
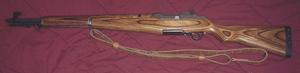
The first major thing that I did was to refinish the stock. Then a bit later I ended up putting it in a laminate stock. Before & after pics can be found here & a post on what all I did can be found here. For the helluvit I ordered a new front handguard spacer from Numrich Gun Parts & put that in the laminate front handguard.
With the new stock I added a Masen Recoil Pad from Midway. The recoil really doesn't bother me but the length of pull was a bit too short for me & the recoil pad added a much needed inch to the stock.
I also bought & installed a National Match Op Rod (from RA Parts whom I highly recommend). The reason I went with a NM Op Rod was mainly because they're built to slightly tighter specs than the standard U.S.G.I. op rods, especially at the gas piston (which should more closely fit the inside of the gas cylinder). But any Op Rod (as long as it's within spec) will work fine.
I found a deal on a National Match rear sight from Fulton Armory so I bought it & installed it. What they sell is a NM base, half minute windage knob, cover, NM hooded aperture & an M14/M1A elevation knob. It's worth mentioning that the elevation knob is 1 MOA but the aperture hood can be rotated to give you a half MOA change if it's needed so the NM rear sight is a true half MOA sight. The difference between the M14 elevation knob & the M1 Garand's elevation knob is the former is scaled in meters while the later is scaled in yards. The Revolutionary War Veterans Association Weblog has a very good series on riflery. It can be found in the left sidebar. Part 8: Ammo & Sights discusses the basics of using iron sights & Part 9: Battle Sights & Staying Alive explains how to use them properly & effectively. But since MOA is judged in yards & my elevation knob is graduated in meters the numbers won't line up exactly for a given range. 100 meters is approximately 109 yards so I'm going to be looking at 654 yards if I use the 600 setting on my sight since it's in meters (assuming the sight is properly dialed in for the ammo I'm using). Assuming I've got the sight dialed in properly at 200 yards for my ammo that means if I set it to the 600 line it'll shoot around 15 inches high (about 2 MOA) at 600 yards (with 175 grain Sierra BTHP's traveling at 2640 fps). It's not a big deal as the numbers are supposed to be viewed as guidelines (because each rifle/ammo combination is a little different) but it is important enough to know about & compensate for, especially when the range gets kinda long. For instance using the same load as above you’d shoot about 69 inches high if you calibrated your reference marks when shooting at targets measured in yards & then set it to the 1,000 setting (because 1,000 meters equals 1,090 yards).
Anyway the NM rear sights needed fitting. Not much but enough to be a small project. You have to grind the sides of the aperture base as well as the bottom to fit into the sight base. Fulton Armory kindly provides instructions on what to do & how to do it here. I had some fine files but I wanted to take things slow so I used very fine ceramic stones to get the parts to fit.
I installed an Alley globe front sight from Brownells. Installation is very simple; remove the front sight & put the new one on. An allen wrench (which is supplied) is all that's needed to snug it down. The sight comes with several inserts & switching them out is simply a matter of untwisting the knurled locking ring, removing the insert, inserting a new one & tightening the ring down again. I have two posts & 4 aperture inserts but I've noticed that other inserts are available.
Here's a pic of the spare inserts & the sight installed.
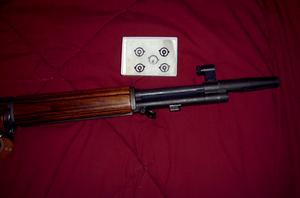
I bought a T-37 flash-hider from Numrich Gun Parts. It's in the picture with the inserts but it's currently off the rifle. I need to have it machined a it as it locks at around 12 O'clock when it should get tight at 6 O'clock. Besides, the bayonet won't fit with it on there, so I'm using the gas cylinder lock that came with the rifle.
I did install a Schuster adjustable gas cylinder lock screw valve from Brownells. This lets me adjust the volume of gas in the gas cylinder so I can use faster powders or heavier bullets (read Firing In Eights for a more detailed look at the ammo suitable for a Garand). It's also great for tuning in a load to where everything functions best. I haven't played with it much but I've heard some folks say it can significantly reduce group size by finding the right amount of gas for that particular load. I have also heard (but haven't tried it for myself) that you can open it up all the way & turn your Garand into a manually operated bolt action. That's useful if you live in a state where hunting with a semi-auto is illegal (though check your local laws before you take it in the field like that) or if you want to just see how your barrel is without wondering if a moving part is causing problems for you.
I also put in a Tubbs chrome silicone hammer spring from Midway to smooth up the trigger pull & a stainless steel op rod spring from Orion 7 (scroll down).
None of these parts are permanent alterations; I could change it back to its original configuration in about 20 minutes with a few tools (specifically an allen wrench, an M3A1 combination tool & rear handguard clip pliers).
I also peened the barrel splines. The gas cylinder sits in these splines on the barrel. U.S.G.I. specs call for an interchangeability of parts, which means a less than ideal fit. Since the front sight is on the gas cylinder it’s very important that the gas cylinder fits very snugly onto the barrel. A .008” move of the front sight will move the point of impact 1 MOA. What’s commonly done to make sure everything is properly snugged is to take a punch & use a mallet or ball peen hammer to peen the splines to improve the fit. The spline on top of the barrel is peened on both edges while the bottom two splines are peened on their outside edges. This (if done right) draws the gas cylinder up onto the barrel. It should mean you have to gently tap the gas cylinder onto or off of the barrel. It also means that the front sight will not move under recoil, thus preserving your zero.
To give an idea of how much it's cost me so far here's a list of the parts I've added & their prices:
Boyd’s stock $100
SS op rod spring $7
Madsen butt pad $10
NM rear sight $130
Hammer spring $7
Front handguard liner $10
Op Rod - $85
T37 Flash Hider $35
Schuster Adjustable Gas Cylinder Lock Screw Valve $35
Alley Globe sight $75
That comes to $494 in parts, not counting the Boiled Linseed Oil & Easy Off (to refinish the original stock); polyurethane (to finish the laminate stock); sanding paper & blocks; files & stones & other hand tools (which I had already) or the labor I put into it. Adding the Turner Sling I have on would increase things to $529 or so. The gas cylinder wrench was $15 & the rear handguard clip pliers were $25. That brings us up to $569. The M10 combination tool at $10 & the M3A1 combination tool at $25 brought things up to $604 for parts & tools I needed to install them (actually I could have made do fine with the M3A1 combination tool but couldn't resist having them both). The M1 bayonet was $80 & that makes the total $684. That also does not include the books I've purchased to learn how & why a Garand operates & how to make improvements to it.
I should point out that Moral-Flexibility's post on Gun Math should be kept in mind (thanks to Say Uncle for digging up the link for me). I don't think it applies that much in this case, as none of the modifications I made were purely cosmetic (though some were partly cosmetic). They were all done with the goal of improving the rifle's function. The laminate stock looks nice (IMHO) but it's main purpose was to provide a very tight bed for the action & a very stable bed in the weather. The T-37 flash hider looks cool, but mainly I was hoping it'd help with the lock up & help the sight picture for low light shooting (but since the T-37 needs some machining I don't have it installed at the moment). The recoil pad adds length which I need but others may not. So that's a potential $10 loss in resale value. Similarly the new front hand guard liner won't increase the resale value, nor will the new hammer spring. Both of those parts simply prevent a detraction from the initial value. & since the T-37 is not functioning properly that's a potential $35 loss. The SS op rod spring - well it needed a new op rod spring, so to keep it from losing value I would have had to buy one. But the SS op rod spring is a few dollars more than a carbon steel one, so if any value was added it's simply the difference between the cost of the SS spring & a carbon steel one - maybe $2. The adjustable gas lock screw valve may or may not be worth the $35 I spent for it. It simply depends on the buyer.
So I bought $494 in parts plus another $190 in tools & accessories (well, not including clips which usually run $1 a piece or so) plus the $400 I paid for the rifle itself. Just the rifle with the parts I have on it now cost me $894 (that's minus the T-37 & with the Turner sling).
None of that really figures the labor I put into it. The sight work took a few hours & I lost track of how long the stock took but if we figure $25 an hour (cheap by gunsmithing standards) with ten hours of labor (a conservative estimate) that adds another $250 to the $894 I have into it (rifle cost plus parts cost minus replacement part cost). So it'd take $1146 for me to break even.
Any idea what it'd go for? Me either. At most I have an educated guess.
A Service Grade CMP Garand usually goes for $600 to $800 depending upon condition. Mine should go for at least $1064 (rifle value plus value of upgraded parts minus replacement parts) but I wouldn't be shocked at $1200. Similar rifles with a new barrel, standard sights & walnut stock usually start around $1400 so I think I'm guessing right about its value.
Fulton Armory's Service Grade Garand starts at $1399 & they guarantee under 2.5 MOA. That includes their standard weight barrel (scroll down a bit) which they sell for $199 as a part or $299 installed (scroll down). A laminate stock costs $50 extra & the NM sights run for $100 extra. The metal is also parkerized which usually runs around $100. So minus the installed barrel & metal finishing plus the NM sights & laminate stock that'd be $1150 for the Fulton Armory Garand. My rifle shoots about 2.5 MOA & most likely a little better with the U.S.G.I barrel it's had since 1947 - that's 8 shot groups, plus it has NM rear sights, a globe-style front sight, a NM op rod, a Turner NM sling & a very tight fitting laminate stock. So I don't think $1200 would be hard to get since my rifle is as accurate as their Service Grade & has some of the additional options they offer, plus one that they don't (the globe style front sight).
Keep in mind that's just the rifle. The accessories such as the bayonet, web gear, original parts, clips & such will add to the value if I sold it as a package.
Course that'd be if I was to sell it & I doubt that will happen anytime soon. Again I'm not looking to sell just pointing this stuff out for folks who might be interested in this sort of thing.
So aside from possibly increasing the resale value of a rifle I'm not looking to sell what are the results of all these modifications?
The black of the targets are 8" in diameter & the ranges they were shot at were at least 100 yards if not a bit over (public land ranges don't usually have yardage markers).
Here's how it shot in September of 2003:
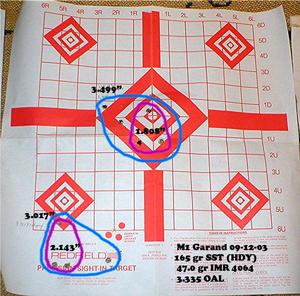
Here's how it shot in February of 2005 (with the new stock but the U.S.G.I. sights it came with):
Here's how it shot this June 24th 2005:
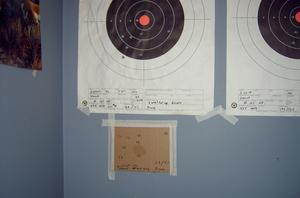
That's a 2.8 inch group (discounting the called flyer which opens things up to 5 inches) at a bit over 100 yards (I believe around 135yards) shot from prone in a moderate drizzle using a hunting bullet (a 165 grain Hornady SST). Keep in mind that's prone, using only a sling as support & with my eyes (which have seen better days) & a load not tuned for optimal accuracy.
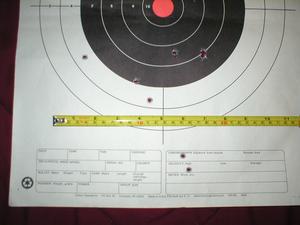
Or if you're more into 3 shot groups here's one from earlier in June of 2005 when I was doing some load development:
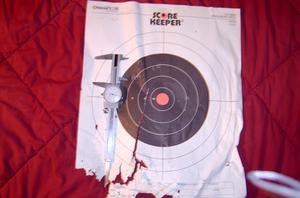
That's 1.367" for 3 175 grain bullets at around 120 yards.
Those were all shot with the Springfield barrel from 1947. It hit 4 on a TE gage when I got it & I'm sure it's hitting 5 by now, so it’s possible that accuracy could start to drop off fairly soon.
The last High Power match I shot was a few weeks back. I try to plot my shots in a notebook I keep as well as recording my scores. I was using Lake City National Match ammo at 600 yards. Not counting sighters & 4 called flyers I was shooting about 4 MOA. Unfortunately that didn't mean all were within the 8 ring but that's another matter. 17 out of 22 shots were in a 24" area elevation wise (that's 4 MOA). They were in an 18 inch area windage wise (that's 3 MOA). 10 of those shots were inside the 9 ring, which is 18 inches in diameter. I know at best I'm a 2 MOA shooter when slung up from prone. With the difference between the group size's elevation & windage I know that at best I was holding 3 MOA that day but probably closer to 4 MOA. That means including the rifle's inherent accuracy I was shooting 4 MOA. Since at best I'm a 2 MOA shooter it's fair to deduce that the rifle was giving me no more than a 2 MOA variable to work with & possibly as little as 1.5 MOA. This is all guesswork though. At 600 yards wind is a factor. There wasn't a lot of wind that day but there was enough to have possibly pushed me into a wider MOA than I was holding or even a tighter MOA than I was holding. Plus at 600 yards that 36" black looks mighty small. An .008" difference in where I put my sight on the target on consecutive shots makes for a 6" difference in where the bullets land. Still, holding 4 MOA at that distance with a barrel installed in 1947 & with over 5,000 rounds through it is not bad. I assume that most of that 4 MOA was me & not the rifle. I'd be interested to see how tight the group would be from my Garand from someone who could really shoot.
Before I go into what I’m hoping to have done sometime soon I’ll mention some other options I could pursue but probably won't right now.
A popular option for match rifles is to unitize the front handguard. This involves eliminating any contact the handguard has with the barrel &/or op rod & gluing or otherwise affixing it to the barrel band. This makes the handguard very thin & only supported at one point, hence very fragile. If you pick up the rifle by the handguard after it has been unitized it could break. My Garand is not a match rifle. I use it in matches, but I also use it for hunting & wouldn’t hesitate to use it for defense, so a fragile front handguard just does not appeal to me.
Many gunsmiths will perform a National Match trigger job on your trigger group. The trigger pull on a Garand should be at least 4.5 pounds on a match rifle & at least 5.5 pounds on non-match rifles. This is for safety reasons due to the nature of the semi-automatic mechanism involved. Most rifle competitions that see a lot of Garands (like High Power) require a 4.5 pound pull. I don't have a trigger pull scale per se, so I just use a fishing scale & some string to get a rough idea. Near as I can tell my trigger is breaking somewhere between 6 & 7 pounds (if the fishing scale is to be trusted), with just a hint of creep in the second stage. But otherwise it's smooth & I don't notice the pull much. I should have Fulton Armory work on the trigger. They charge around $50 to do a National Match trigger modification which should result in a glasslike break after 4.5 to 4.75 pounds of pressure is applied to the trigger. With the hammer spring I installed the pull is smooth enough for what I’m doing now & I probably won’t do anything to it until after I’ve done a few other things. There is something I can do in the meantime to improve the trigger pull, but I'm not too comfy with doing trigger work myself. Besides, I'm not to the point where the trigger pull is holding me back.
A fellow named Clint Fowler will make sure your op rod is aligned then install op rod guides to keep it aligned. He'll also put additional lugs on the rear &/or sides of the receiver. The op rod guides are tempting, but I'll hold off for a bit on those. I'm undecided about adding lugs to the receiver. One day I might give it more thought.
McCann Industries will do a complete re-working of your Garand. Their process involves shortening the op rod (& along with it the sight radius) & rechambering it for .338 Winchester Magnum. & who said a Garand couldn't be a good African plains gun? I'll probably pass on that as I'm pretty comfy with the '06. But if I ever did want to rechamber it for a seriously powerful mid bore cartridge they'd get a call.
Numrich Gun Parts sells a "tanker" kit. All that's left is finding a gunsmith to put the barrel on for you. It is a tempting idea as an 18" barreled Garand would make a great trunk gun.
Contrary to popular belief Garands can be fitted with scopes. There are 4 ways to do this. The first is to have Griffin & Howe install a receiver mounted scope base like they did when they were converting M1's into M1C's. The second is to buy an M1D kit from Numrich & have a gunsmith install it. The M1D used a barrel mounted scope base as opposed to the M1C's receiver mounted base. The third way is to buy a no gunsmithing type mount. These usually replace the rear sight. Brownells sells an S&K mount & Midway sells a B-Square mount. The disadvantage to those methods is that the scope is offset to the left of the receiver. That means if you have it sighted in at 200 yards it'll shoot low & to the right at 300 yards. You have to compensate for windage as well as elevation. The fourth option avoids that. It's simply mounting a base directly over the barrel & using a Long Eye Relief scope. Essentially this creates a "scout" type Garand. Fulton Armory sells a handguard with a rail built in & there are a few gunsmiths who will install a mount or rail directly on the barrel for you.
Personally I'm fine with the iron sights I have. If it's far enough away that I'd need a scope's magnification then I'm probably not skilled enough to be shooting at it. Scopes do make shooting easier - even with little or no magnification, but I'm happy riding this iron sight thing out for now. Though I have to admit it is another temptation.
Refinishing the metal is something that all old rifles need to have done periodically. There are a multitude of options, from shops that will parkerize or blue your rifle, to spray on/bake on finishes you can either do yourself or pay a gunsmith to do for you. The Smallest Minority had his Garand refinished & it's something I should do, but probably won't for a little bit yet.
But now for the work I’m hoping to have done:
I don't have the tooling or the skill to install a new barrel properly & I've been drooling over a Krieger stainless steel heavy match barrel with a 1:11 twist) for a while, so I'll have to buy the barrel & get a gunsmith to install it.
That's going to run around $500 or so depending on who I use. I might go ahead & get a new Badger Ordnance gas cylinder from Brownells & possibly have the op rod re-tipped. That'd be about $700 in parts & labor all totaled up.
That would bring the cost to around $1600 or so for parts & work done to the Garand (including what I paid for the Garand but not including tools & accessories I bought). Now we're entering the land of diminishing returns. Right now my rifle will shoot into less than 2.5 inches at 100 yards if I do my part. Will throwing another $700 bring about a big difference? Maybe, maybe not. I don't expect Garands to shoot less than .75 MOA. Right now it's shooting at least 2.5 MOA (for 8 shot groups) & quite possibly it'll do a lot less. Roughly $500 got me from over 3.5 MOA to close to 2 MOA. An additional $700 will probably not shrink group size another inch & a half. (I am talking about 8 shot groups, not 3 shot groups.)
What it will do is give me a brand new barrel, which means another 5,000 rounds (maybe more) where I can expect very good accuracy. That accuracy should be in the 1 MOA neighborhood if everything goes right. Now I'll be the first to admit I'm not a 1 MOA shooter. I simply cannot hold 1 MOA no matter how good the rifle is or what it's capable of. I'm probably around 4 MOA standing & between 2 & 3 MOA prone & sitting. It would not be pragmatic for me to wring any more accuracy out of my Garand. 2 MOA is more than good enough for a rifle that's not a dedicated target gun. But I'll probably do it anyway. Why? Well for one the 1:11 twist of that Krieger match barrel will do a better job of stabilizing the 168 & 175 grain bullets I like to shoot. Another thing is the extra mass will make it a little more consistent as the barrel won't heat up quite as fast & vertical stringing will be less pronounced. The stainless steel will be easier to clean (at least that's been the case in my experience) & as I mentioned before I'll have 5,000 rounds to shoot before I can expect accuracy to deteriorate.
Additionally a new Krieger barrel will mean that I can have the headspace set where I want it as well as the bullet jump (within reason). The Garand's chamber is a bit generous by commercial standards (to ensure reliable function with less than the cleanest of ammo or chamber) & wears brass down pretty quick. A tighter chamber should give me another loading or two of each case. The cartridge length is restricted by the magazine length. 3.340” is the most you can get out of a .30-06 Springfield cartridge that will still fit in the magazine. To be on the safe side I never load longer than 3.335” (& try to stay right at 3.330”) so feeding won’t be an issue. I haven’t made a Cerrosafe cast of my chamber, but I have measured the distance from the bolt to the beginning of the rifling. I took a 180 grain flat based bullet, seated it backwards in an unprimed sized case & let the bolt slam home. The extracted bullet will show the length from the back of the case as it’s seated against the bolt face to the beginning of the rifling. In my case this yielded a measurement of 2.798”. Remember that a rifle bullet is curved into a point. I use a comparator to find out how far the bullet bearing surface is from the rifling. That space is called “bullet jump” or “free travel” & it’s commonly thought that the less of this the better the accuracy will be. However it’s important to not jam the bullet against the lands before firing as this will increase chamber pressure, possibly to unsafe levels. Usually a jump of .01” to .02” is considered best, but the benchresters often like bullets just touching the rifling. Other folks have obtained very good results with the bullet as much as .05” off the rifling. It take some experimentation to figure out what the best free travel length for each rifle is & to be honest I haven’t got it precisely figured out with my Garand yet. A comparator is simply a device that lets you measure a bullet from the point in its ogive (or curve) that is bore diameter instead of measuring from the tip. A round of Lake City ammo with a 150 grain FMJ bullet that measures 3.327 over all comes to 2.614” when a comparator is used for a jump of .184”. A Lake City Match round with a 173 grain BTHP measures 3.327 overall & 2.682” with a comparator for a jump of .116”. A handload of mine with a 165 grain Hornady SST bullet measures 3.327” overall & 2.662” with a comparator for a jump of .136”. Another handload of mine with a 168 grain Hornady BTHP measures 3.330” from the tip & 2.690” with a comparator for a jump of .108”. As you’ve figured out the closest I’m getting is slightly over .1” from the rifling with as much as .18” of free travel. Now it could be that my rifle likes that much movement in a bullet before it engages the rifling. I simply do not know. But with a new barrel I can have the throat start much closer & have less jump without having to load cartridges so long that they won’t fit in the magazine. If it turns out for some reason my Garand shoots better with more jump I can always seat the bullets deeper. Because of the magazine length I have to work with I can’t seat them longer if it’s necessary. So a new barrel with a new chamber & throat are the best options.
Besides, since a 9 pound rifle seems to bother some folks (Mine weighs roughly 9.75 pounds right now unloaded) I'd love to see what they say when I tell them mine weighs closer to 11 pounds. :)
But the new barrel will have to wait for just a while. I'm perfectly happy with the accuracy my Garand seems to have. Odds are in the hands of a better shooter it might prove to be more accurate than I suspect. & if I play around with the loads &/or the adjustable gas cylinder I might be able to see some more improvement.
So that's where my Garand is at as of right now. It's still shooting good (better than I can use at the moment) & functioning flawlessly. If you can do a little work on your own you can turn a rack grade Garand into a decent shooting rifle for a bit less than you'd pay a gunsmith. Course going that last little bit usually does require a gunsmith & I'll tell you about that when the time comes. For now I'm just going to enjoy my Garand as is & try to work on the part of the rifle most prone to error - the operator.
cross posted at The Shooter's Carnival
Posted by Publicola at November 15, 2005 07:48 AM | TrackBack